The
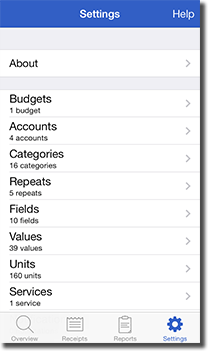
Settings tab allows you to manage app settings, set up syncing, import/export data, and save/restore backups.
Tap
About to view app info, statistics, contact details, or to write an app review. The
Store section (Receipts only) displays the Pro upgrade status. Purchase the
Pro upgrade to allow an unlimited number of receipts to be added. Tap
Restore Previous Purchases to restore the Pro upgrade.
Tap
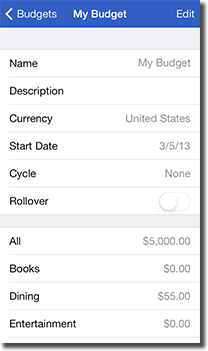
Budgets to add, edit, or delete budgets. Select
Global Budget to assign a budget that applies to all accounts. If a budget is selected, a budget bar appears in the All account (and any account categories). The next section lists all budgets. Budgets must include a start date and may optionally include a cycle. If a cycle is set, the budget amounts may be rolled over to the next budget period by enabling the
Rollover switch. Each budget includes
All and a list of categories. Set the budgeted values for each category of interest. Note that budgets may be assigned to multiple accounts. If an account has a budget assigned to it, a budget bar will appear in the account under the Receipts tab. Each account category will also include a budget bar that displays how much of the budget has been used for that category.
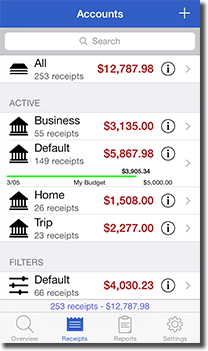
Tap
Accounts to add, edit, or delete accounts. All account receipt attachments or all account receipts may be deleted. Deleting an account will delete all of its receipts and attachments. Each account has a name, description, icon, currency, budget, starting receipt number, and active switch. Select an icon from the library or add a new icon from an album. Tap the
Tint button to set an icon colour. If the account currency is different from the home currency, each receipt will include a separate total field for the account currency. Selecting a budget will add a budget bar in the accounts list view under the Receipts tab. Also, a budget bar is included for each account category that has a budget value assigned to it (as well as the All category item). The starting receipt number is the minimum number assigned to new receipts and is only used if the
Global Receipt Numbers setting is disabled.
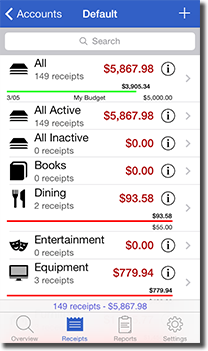
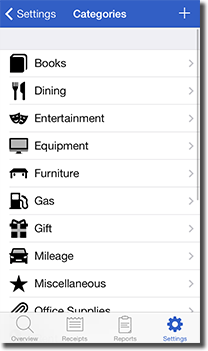
Tap
Categories to add, edit, or delete categories. Subcategories are created by assigning a parent category to a category. An unlimited number of subcategories may be created. Deleting a category moves all receipts from that category to the
None category (which can not be deleted). Tap a category to see a summary of the category receipts for all accounts.
Tap
Repeats to see a list of all repeating receipts. Tap
Show Future Repeat Receipts to select how far in advance to show repeat receipts. By default, this setting is disabled and repeat receipts are added on the receipt date. The next section displays active repeats which continue to add new receipts. The last section shows inactive repeats which no longer generate new receipts. Delete a repeat by tapping the
- button on the left. Delete either the repeat and receipts or only the repeat itself (leaving all current receipts intact). Tap a repeat to see a list of receipts it contains.
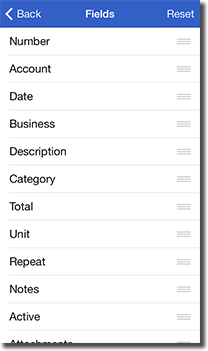
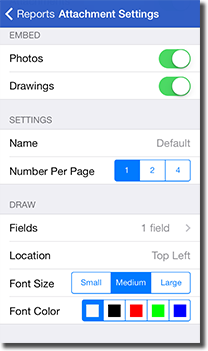
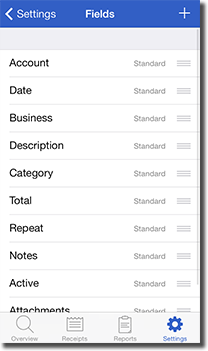
Tap
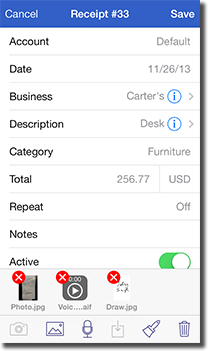
Fields to add, edit, or delete receipt fields. Reorder fields by dragging the icon on the far right of each field to a new location. Changing the field order changes the layout of the receipt view. Note that
Standard fields can not be deleted although they may be renamed and reordered. Nine types of custom fields may be added including currency, date, list, number, percent, percent total, switch, tags, and text. The currency field always uses the same unit as the total unit for a receipt. List and tag fields contain a list of user items that may be added by tapping the info button on the right side. Tag fields are different from list fields since they may have zero or more items selected while lists always have only one item selected. Percent total fields automatically set their value to a percent of the total value. This value is calculated when the receipt total is modified. Tap the info button to change the percentage to use and enable the
Included in Total switch if the value is already included in the receipt total. Switch fields support an on or off state and are included with values 1 or 0 in reports. Deleting a field will also delete all receipt data for that field.
Tap
Values to see a list of textual fields that contain previous values. The
Separate Account Values option specifies whether or not to separate textual values by account. If enabled, each field's values are saved separately for each account. If disabled, all field values are saved independent of the account. Tap the
+ button to add a new value. Tap an existing value to change it. Delete a value by tapping the
- button next to it. Tap the
Reset button to reset all values given the current receipt values or clear all values for the field.
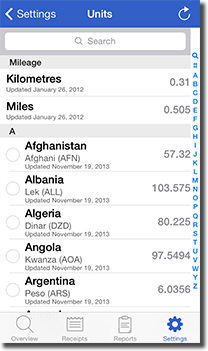
Tap
Units to manage mileage and currency exchange rates. For mileage, tap either
Kilometres or
Miles to set the amount per kilometre or mile in the home currency. For currencies, tap the currency and set the exchange rate relative to your home currency. To download the latest currency exchange rates, tap the refresh button on the top right of the view. To save a favourite currency, tap the circle to the left of the currency. Favourite currencies appear at the top of the Units list in the receipt view.
The
Services section is used to save account details for Box, Dropbox, Evernote, and Google Drive services. It is used for reports, backup, import/export, and sync features (if supported). The default folder can also be set for Box, Dropbox, Evernote, and Google Drive accounts. New folders may also be created. Tap
Logout to clear the account details.
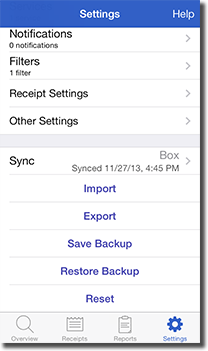
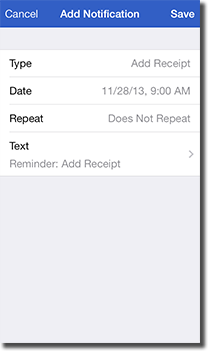
The
Notifications view allows system reminders to be set up. Notifications for adding new receipts, saving a backup, and sending a report may be added. Select the date, repeat period, and notification text. Notifications are displayed even if Receipts is not running.
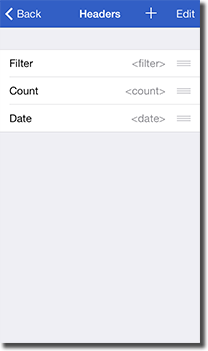
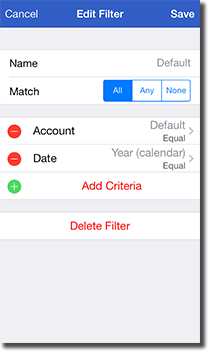
Tap
Filters to add, edit, and delete receipt filters. Filters are used to limit which receipts are included in overview graphs, receipt lists, reports, and exports. Each filter includes a list of criterion. A filter may be set to match all, any, or none of the criterion. Each criteria specifies a field and may include a match selection and value.
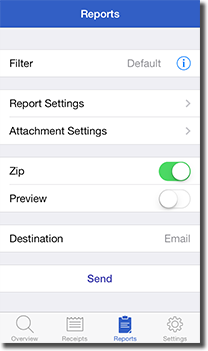
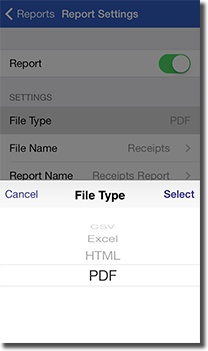
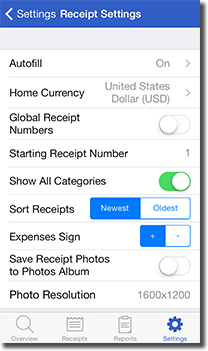
Receipt Settings
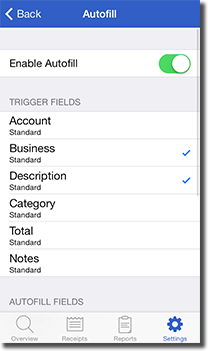
Tap
Autofill to configure receipt autofill settings. If enabled, autofill populates receipt fields based on the last receipt with the same field value. Select which
Trigger Fields to use to invoke autofill. When a trigger field's value is set, the other fields are populated based on the last receipt with the same field value. The
Autofill Fields are the fields that are populated if a matching receipt is found.
Tap
Home Currency to set the local currency. If a receipt has a unit that is different from the home currency, an extra total field is included with the home currency total value.
Enable
Global Receipt Numbers to use unique receipt numbers for all receipts across all accounts. Disabling the setting results in unique receipt numbers within each account but potentially duplicate receipt numbers across accounts.
The
Starting Receipt Number setting is the minimum receipt number used across all accounts. Changing the starting receipt number does not impact existing receipts, it only applies to new receipts. Note that if the global receipt numbers setting is disabled, each account's
Starting Receipts Number is also used to determine the starting number.
Enable the
Show All Categories setting to display all categories in the category list view. Disable the setting to hide categories that do not contain any receipts. Even if the categories are hidden, they may still be selected when adding a new receipt.
The
Sort Receipts setting specifies how to sort receipts under the Receipts tab.
The
Expenses Sign setting allows expenses to be displayed as either positive (the default) or negative values. If expenses are negative, income values are then positive.
Enable the
Save Receipt Photos to Photos Album setting to save each new or edited receipt photo to the Photo application's
Saved Photos Album.
The
Resolution setting contains the maximum resolution to be used for receipt photos. The
Full Size option will use the native resolution for the device camera.
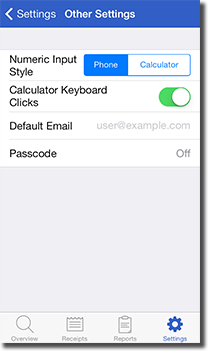
Other Settings
The
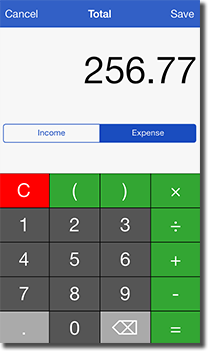
Numeric Input Style setting sets the style of numeric keyboard to use throughout Receipts. The
Phone style lays out the numeric keyboard similar to a phone keypad with numbers incrementing from the top. The
Calculator style is the opposite with numbers displayed similar to a calculator.
Set the
Calculator Keyboard Clicks setting to enable keyboard clicks when tapping the calculator.
The
Default Email setting sets the default email address used for emailing overview graphs, receipts, and reports. Multiple email addresses may be entered by separating each address with a space.
The
Passcode setting allows you to set a four digit passcode that is required at startup and when switching from the background to unlock Receipts. Do not lose the passcode since there is no way to retrieve your data if lost. If set, the passcode must also be entered before resetting the app.
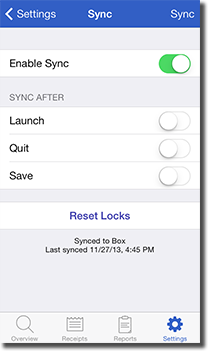
Sync
Tap the
Sync button to manage sync options. Sync repositories may be created on Box, Dropbox, or Google Drive. Receipts uses a custom locking mechanism to prevent multiple clients from trying to sync at the same time. All receipts (with attachments), budgets, accounts, categories, repeats, fields, and most other settings are synced. The
Sync After section specifies when Receipts should sync to the repository. Enable
Launch to sync after app launch (or switching from the background),
Quit to sync after the app exits (or is moved to the background), or
Save to sync whenever a receipt is added/edited. Sync may be manually initiated at any time by tapping the
Sync button on the top right. Alternatively, pull down the accounts, categories, or receipt list views to start syncing. Tap the
Reset Locks button if a lock was not updated correctly (due to another client exit/crash) and is preventing access to the repository. Note that resetting locks could corrupt the sync repository if another client is currently syncing. If sync is enabled, new receipts are not assigned receipt numbers until they have been synced. Also, if a client has updated a receipt that has also changed on the server, the client version of the receipt is uploaded.
Import/Export
Tap
Import to import receipts (CSV) and attachments. Column headers are listed on the left with matching fields listed on the right. Each column header may be matched to a field in Receipts or not imported. Select a column to modify its settings. Enable
Import to import the column, select the
Field to import to, and specify any other field settings (if applicable). Account, category, list, and tag fields include an option to automatically create new values if they don't already exist. Total fields include a
Unit setting for specifying the total unit. Date fields include a
Format setting for specifying the date format. The date format must follow conventions specified by the
Unicode Technical Standard #35. Attachment fields include a
Folder setting for specifying which folder to use for the attachments. Once the settings are configured, tap
Parse to display the receipt list. Select which receipts to import from the receipt list by selecting the circle on the left side. By default, Receipts will automatically select any new receipts. Tap
Import to import the receipts.
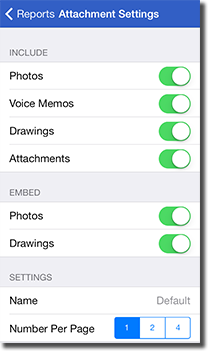
Tap
Export to export receipts (CSV) and attachments. Select a filter to limit which receipts to include. Select the receipt fields to include and reorder them by dragging the icon to the right of each field. Enable the
Data switch to include the export file and the
Photos,
Drawings,
Voice Memos, and
Attachments switches to include various attachment types.
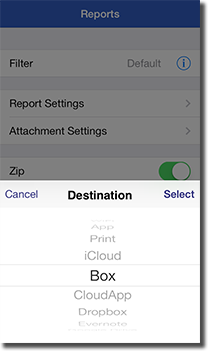
Backups
Save Backup and
Restore Backup allow you to save and restore backups to a variety of destinations including email, iTunes File Sharing, WiFi, other devices, other apps, iCloud, Box, Dropbox, Evernote, and Google Drive. The backup includes all receipts, attachments, and application settings (except for service account details). Restoring a backup will replace all existing receipts and settings.
- To restore a backup from an email, open Mail, select the email, and tap and hold the backup file until the Open sheet appears. Select Receipts from the list of apps. Note that backup files can quickly become very large (especially with attachments) and most email providers limit messages to around 5-10 MB.
- To use iTunes File Sharing, follow the instructions above in Reports but use the Add... button instead of Save To... to upload the backup file from your computer to the device.
- Restoring a backup using WiFi requires both the device and computer to be connected to the same WiFi network. Open the URL in a browser on your computer and select the backup to restore.
- To save/restore a backup to another device, first make sure both devices are connected to the same WiFi network. Tap Save Backup on the source device and Restore Backup on the destination device. Tap the name of the device to connect to from the destination device. The data will be transferred over the WiFi connection and then restored on the destination device.
- To restore a backup from another app, tap the file and open it in Receipts. Receipts will recognize the file type and display an alert to authorize restoring the backup.
- Selecting iCloud, Box, Dropbox, Evernote, or Google Drive will first download a list of available backups from the default folder (if applicable) from the service. Select the file to restore. Note that backups can be very large files and it can take significant time to save or restore to a web service. Receipts supports completing uploads and downloads in the background.
Reset
Tap
Reset to reset all previous text values, delete all receipt attachments, delete all receipts, or reset Receipts back to its original state. If a passcode is set, it must be entered before the reset.
 Overview